Making learning materials accessible mainly means allowing students flexibility in working with the materials. This does not only help students with disabilities or limitations, but also those who learn in a different way. Before we get to the Guidelines for Accessible Materials, we would like to give you a few ideas for how you can generally make your courses more accessible for a greater number of students.
If you require technical support for your course, the Center for Audiovisual Production is happy to help: zap@uni-mainz.de. Podcast/Audio Recordings
Record your lecture as an audio file and make it available as a podcast.
Video Recordings
Of course, it’s even better to use video recordings with video.uni-mainz.de. You can make them available exclusively for your students and sync your slides automatically.
This helps:
• students with visual impairments
• with catching up on and repeating lessons (on bus or train)
• students with hearing impairments (who can use specific devices to listen later)
• students with cognitive impairments (who can press pause or adjust the playback rate)
Hand out materials ahead of time
Make notes and teaching materials available at the beginning of the semester. Students can then prepare better for the course depending on their special needs and can print out the slides in oversize (for the visually impaired) or read through materials ahead of time, for example.
This helps:
– everyone
As a rule, it’s important to know how students with impairments process the materials. Students with visual impairments, for example, might have a so-called screen reader to read material for them. A screen reader reads unformatted text from top left to bottom right. If the listener wants to hear a passage again and the text is not formatted, the only option is to listen to the entire text again. The listener can only “turn pages” by fast-forwarding or rewinding, without any indications for when they should stop again. By implementing a few simple things, you can greatly facilitate your students’ learning:
1. Structure Your Text
Word: Use the style function in Word: Alt+Ctrl+Shift+S → Options → Select styles to show → Choose styles → All styles. Mark headings, lists, bullet points, links, quotations, etc. as such. For the screen reader, the style will work like bookmarks and allow users to jump to relevant sections.
PowerPoint: Unfortunately, PowerPoint does not offer any styles. Instead, you will have to make sure the reading direction is correct when creating your slides. You can do this under Home → Arrange → Selection Pane. Additionally, you should title your slides. The titles will then function like bookmarks.
PDF: As a rule, we recommend not using PDF. The limited display options do not allow students to adapt the content to their needs. However, if use of PDF is unavoidable, make sure you check ACROBAT →Default settings→ Accessibility and Document structure tags for accessibility when exporting from Word or PowerPoint.
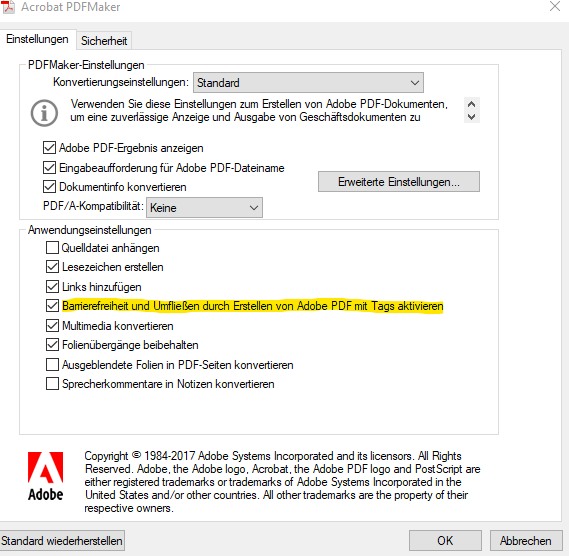
2. Select the Language
In order for the screen reader to know which language to read in, you have to select the language of the document. You can do that by selecting Home →Language. If you have multiple languages within your document, in quotations, for example, select the language anew for each respective paragraph.
3. Alt Texts
Try using pictures and diagrams parallel to the text instead of as an exclusive form of information. If you do use pictures and diagrams, include a comprehensive alt text for screen readers to read. If a picture is only decorative, you can select that option in the alt text box, so it is apparent for everyone.
4. Tables
Tables should be as clear as possible. If your tables stretch across several pages, activate the header row for every new page. This makes it easier to keep an overview, and students have to turn fewer pages.
5. Scanning Texts with Character Recognition
If you scan texts from source materials for your students, use software with character recognition (such as FreeOCR or Omnipage). This helps display the text better, and also allows for a search of the text.
6. Contrasts
Make sure you use the highest possible contrast when choosing text and colors. Black on white is the best option. If you want it to be more colorful, you can use the program Color Contrast Analyser, for example, which you can download by clicking on the following link: https://developer.paciellogroup.com/resources/contrastanalyser/
7. Check your Documents
Microsoft Office now offers an accessibility check. You can find it under Review → Check Accessibility.
- Accessibility: Inclusive E-learning
- Hand-out for the creation and implementation of accessible materials in teaching
- Guidelines for the creation of accessible documents – Office for the Preparation of Accessible Teaching Materials – University of Kassel
Author: Anna Heym (Center for Audiovisual Production)

